You know the one.
It's sitting on your shelf right now. The binding is cracked. Pages are loose or missing. Maybe it was your grandmother's cookbook, a childhood favorite, or a vintage find from the thrift store.
Too damaged to read. Too meaningful to throw away.
Here's what most people don't realize: that worn cover is the beginning of something beautiful, not the end.
With a few simple supplies and an afternoon, you can transform any hardcover book into a stunning handmade journal—one that carries the character of its past life while giving you fresh pages to fill with your own story.
Why Turn Books into Journals?
This isn't just crafting. It's resurrection.
You preserve what matters. That vintage cover, the embossed lettering, the patina of age—it all stays. You're not destroying a book; you're giving it purpose again.
You create something one-of-a-kind. No two book journals are alike. Each carries its own history, its own character. Try finding that at the stationery store.
You choose your own pages. Lined for writing? Blank for sketching? Graph paper for planning? Watercolor paper for painting? The inside is entirely up to you.
You make meaningful gifts. Imagine giving your daughter a journal made from your mother's favorite novel. Or turning a vintage cookbook into a family recipe journal. These aren't just gifts—they're heirlooms.
What You'll Need
The supply list is shorter than you'd think:
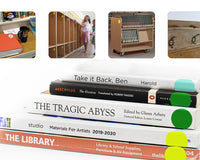
- A hardcover book — Damaged is fine (preferred, actually)
- Replacement paper — Your choice of style and weight
- Bone folder — For crisp folds and smooth application
- Craft knife or scissors — For removing old pages
- Ruler and pencil — For measuring
- Cloth book binding tape — This is the secret to a professional finish
- Binder clips — For holding pages while adhesive dries
The tape matters more than you'd think. Cheap tape yellows, cracks, and peels. Quality cloth binding tape creates a hinge that flexes naturally and lasts for years. It's the difference between "homemade" and "handcrafted."
Step-by-Step: From Worn Book to Beautiful Journal
Step 1: Choose Your Book
The cover is everything. Look for:
- Interesting texture — Cloth, leather, or embossed covers work beautifully
- Right size — Consider how you'll use the journal
- Sentimental value — Or interesting vintage finds
- Damage that doesn't affect the cover — Loose pages, cracked spine, water-damaged interior are all fine
Don't use a book that's still readable and enjoyable. This technique is for saving books that would otherwise be discarded.
Step 2: Remove the Old Pages
This is oddly satisfying.
- Open the book and locate where the pages attach to the cover
- Use a craft knife to carefully cut along the inside edge of the spine
- Remove pages in sections—don't try to pull everything at once
- Clean any remaining paper or old adhesive from the inside of the spine
- You should be left with just the front cover, back cover, and spine
Pro tip: Save a few original pages to include in your journal. An old title page or illustration makes a beautiful first page.
Step 3: Prepare Your New Pages
Cut your replacement paper to size:
- Measure the inside of your book cover (height and width)
- Cut paper about ¼ inch smaller than the cover on all sides
- Create "signatures" — fold sheets in half and nest them in groups of 4-6 sheets
- For a standard journal, 5-6 signatures (20-36 sheets) works well
Paper options by use:
- Writing journal: 24-32 lb writing paper or lined paper
- Sketch journal: 60-80 lb drawing paper
- Mixed media: Variety of papers for texture
- Recipe journal: Card stock that handles spills
Step 4: Create the Binding
Here's where cloth binding tape transforms your project from amateur to artisan:
- Stack your signatures and align the folded edges
- Clamp with binder clips to hold everything in place
- Cut a piece of cloth binding tape the height of your pages
- Apply the tape along the spine edge of your stacked pages, wrapping around to create a fabric hinge
- Press firmly with a bone folder to ensure good adhesion
- Let dry for 10-15 minutes
Why cloth tape works: It's flexible enough to let pages open flat, strong enough to handle daily use, and archival-quality so it won't yellow or fail over time.
Step 5: Attach Pages to Cover
The final step—and the most rewarding:
- Apply cloth binding tape along the inside of the book's spine
- Position your page block so the taped spine aligns with the book's spine
- Press the tape firmly to attach pages to the inside of the spine
- For extra durability, add a strip of tape where the first and last pages meet the inside covers
- Use binder clips to hold everything while the adhesive sets
- Let dry completely
Open and close your journal a few times to ensure the binding flexes naturally.
Ideas to Inspire Your First Project
The Family Recipe Journal
Transform your grandmother's worn cookbook into a place to collect family recipes. Include the original title page, add blank recipe cards, and pass down two generations of cooking wisdom in one beautiful book.
The Travel Journal
Find a vintage atlas or geography book at a thrift store. Keep a few original maps as section dividers between destinations.
The Memory Book
Turn a childhood favorite into a journal for recording memories with your own children or grandchildren. The cover tells one story; the pages inside will tell another.
The Gratitude Journal
A worn book about a subject you love becomes a daily reminder of what matters. Poetry books, nature guides, and vintage novels all work beautifully.
The Gift Journal
Create a personalized journal for someone special using a book that's meaningful to them—their favorite author, a subject they love, or a title that holds shared memories.
Your Book Is Waiting
Somewhere in your home, a book is waiting for its second chapter.
Maybe it's been on that shelf for years, too worn to read but too loved to release. Maybe you've walked past it at the thrift store a dozen times, drawn to the cover but not the condition.
Now you know: that's not a book at the end of its life. It's a journal at the beginning of yours.
The supplies are simple. The technique is forgiving. And the result is something no store can sell you—a one-of-a-kind journal with a story already built into its cover.
Ready to Start?
- BookGuard Premium Cloth Tape — The binding that makes it professional
- Book Repair Corners — Reinforce worn cover corners
- Book Repair Wings — Extra strength for the hinge
Pick up that worn book. Feel the cover. Imagine filling it with your own words.
This weekend, give it a second life.